Difference between revisions of "Picorder"
Directive0 (Talk | contribs) |
Directive0 (Talk | contribs) (→Youtube Video) |
||
| (36 intermediate revisions by the same user not shown) | |||
| Line 1: | Line 1: | ||
| − | + | [[File:Picorder.jpg|thumb|The TR-108 Environmental Picorder]] | |
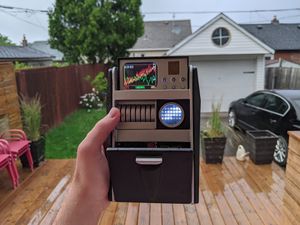
| − | The Picorder | + | The TR-108 (or Picorder) is a Raspberry Pi Zero based system that includes a sensor package, battery, display and supplemental components to provide a satisfying and accurate [https://en.wikipedia.org/wiki/Tricorder Tricorder] experience. In the interest of inspiring others to build on what I have done I am providing all of the documentation I can. |
| + | |||
| + | The original TR-108 has now been succeeded by the TR-109 (or [[Picorder 2]]) | ||
| + | |||
| + | ==Construction== | ||
| + | |||
| + | The Picorder was constructed over about 6-8 months. It utilizes a Raspberry Pi Zero W as its CPU. I decided to use a Diamond Select TOS Tricorder toy as my base, since it was the biggest Tricorder easily available. The screen is an off the shelf 6 Volt Composite screen, by adafruit. Originally I had planned to use seperate descrete sensor components, but eventually decided on the Sensehat sensor board, as it provided good value and completeness. For power the Picorder uses an 18650 LiPo battery that is part of an off the shelf portable battery pack that charges and boosts the battery to 5Volts and can supply about 2 Amps of power. | ||
| + | |||
| + | Internally the Picorder uses a perforated protoboard as a circuit backplane so all the components can lay flat within the enclosure. The backplane is affixed to the back panel of the Tricorder enclosure with Apoxie Sculpt mounds that have nuts embedded into them. | ||
| + | |||
| + | The screen enclosure had to be destructively dissasembled, and the standoffs that were broken were fully removed to provide maximum space within the case. The original button and LED pcb was removed and discarded, a new PCB replaced it that merely passed signals to and from the Pi. Everything is held in place with Apoxie Scuplt and so is very crude. | ||
| + | |||
| + | The current status of the Picorder is somewhat complete. Basic functionality has been achieved; the program logs values from the sense hat and displays them. | ||
| + | |||
| + | ==Errors== | ||
| + | The screen selected for this project is 6 Volts, not 5. I had to use a boost module to provide the screen with a steady 6+ volts so it would work without flickering. | ||
| + | |||
| + | |||
| + | |||
| + | ==Wiring== | ||
| + | {| | ||
| + | |[[File:Picorder_wiring.png|none|200px|thumb|Picorder Wiring Diagram]] | ||
| + | |[[File:Backplane assembled.jpg|none|200px|thumb|Picorder Backplane with sensehat attached]] | ||
| + | |} | ||
| + | |||
| + | ==Sources== | ||
| + | This project was made possible by information and inspiration provided by these sources: | ||
| + | |||
| + | - https://hackaday.io/project/5437-star-trek-tos-picorder | ||
| + | - https://github.com/tobykurien/rpi_lcars | ||
==Resources== | ==Resources== | ||
| + | ===Hardware=== | ||
| + | You can find all the necessary construction documents in the "construction" folder at the [https://github.com/directive0/picorder github link]. | ||
| + | |||
| + | Adafruit parts Wishlist is here: | ||
| + | http://www.adafruit.com/wishlists/435166 | ||
| + | |||
| + | The base I used for the tricorder: | ||
| + | https://www.amazon.ca/gp/product/B001820194/ref=ox_sc_sfl_title_6?ie=UTF8&psc=1&smid=A3DWYIK6Y9EEQB | ||
===Software=== | ===Software=== | ||
| − | [https://github.com/directive0/picorder/blob/master/README.md | + | Originally the Picorder ran on [https://github.com/directive0/picorder/blob/master/README.md standalone software], but now is supported by [[PicorderOS]] |
| − | ===Youtube Video=== | + | ==Media== |
| + | [https://www.reddit.com/r/startrek/comments/bwqis/does_anyone_else_really_want_a_working_tricorder/ This] is the reddit post I made in 2009 that first started me on the journey. | ||
| + | |||
| + | ====Youtube Video==== | ||
I decided to make a youtube video under my [[Obso1337]] channel to walk through how I designed and built this device. | I decided to make a youtube video under my [[Obso1337]] channel to walk through how I designed and built this device. | ||
{{#evt: | {{#evt: | ||
service=youtube | service=youtube | ||
| − | |id=https://www.youtube.com/watch?v=tcB4Tia2YYU | + | |id=https://www.youtube.com/watch?v=tcB4Tia2YYU |
| − | |alignment= | + | |container=frame|alignment=inline |
}} | }} | ||
| + | |||
| + | |||
| + | Later I made a video detailing the tear down of the original build in preparation for a rebuild (still to come). | ||
| + | {{#evt: | ||
| + | service=youtube | ||
| + | |id=https://www.youtube.com/watch?v=Va_liZ-Un3k | ||
| + | |container=frame|alignment=inline | ||
| + | }} | ||
| + | |||
| + | ====Media Coverage==== | ||
| + | The Picorder has been discussed in a couple places so far. I'm honoured to have a project of mine covered by these publications. | ||
| + | |||
| + | * http://hackaday.com/2017/08/18/picorder-raspberry-pi-stands-in-for-stone-knives-and-bearskins/ | ||
| + | : A very nice piece written for Hackaday by Al Williams. | ||
| + | |||
| + | * https://www.neoteo.com/picorder-un-tricorder-basado-en-el-raspberry-pi/ | ||
| + | : A story for Neoteo. Written in Spanish by Lisandro Pardo | ||
| + | |||
| + | ===Similar and Clone Devices=== | ||
| + | |||
| + | * https://www.youtube.com/watch?v=UepVcfApy7A | ||
| + | : Somewhat rudimentary, but nevertheless effective clone of the TR-108. Uses a standard project box instead of the DS Tricorder Toy. | ||
| + | |||
| + | * https://www.youtube.com/watch?v=mOXdTw0fTD4 | ||
| + | : A clone of the tr-108 with extended capabilities and features. Very nice build into a DS Tricorder toy but with improved accuracy to screen prop. | ||
| + | |||
| + | * https://www.youtube.com/watch?v=Xh7VfrmUPGU | ||
| + | : Completely unique device. Not a clone of the tr-108 but an entirely new device built into a TNG Tricorder using the BM680 and AGM88 sensor packages. | ||
| + | |||
| + | [[Category:Electronics]] | ||
| + | [[Category:Python]] | ||
Latest revision as of 13:04, 14 March 2024
The TR-108 (or Picorder) is a Raspberry Pi Zero based system that includes a sensor package, battery, display and supplemental components to provide a satisfying and accurate Tricorder experience. In the interest of inspiring others to build on what I have done I am providing all of the documentation I can.
The original TR-108 has now been succeeded by the TR-109 (or Picorder 2)
Contents
Construction
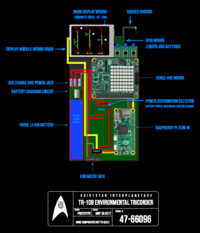
The Picorder was constructed over about 6-8 months. It utilizes a Raspberry Pi Zero W as its CPU. I decided to use a Diamond Select TOS Tricorder toy as my base, since it was the biggest Tricorder easily available. The screen is an off the shelf 6 Volt Composite screen, by adafruit. Originally I had planned to use seperate descrete sensor components, but eventually decided on the Sensehat sensor board, as it provided good value and completeness. For power the Picorder uses an 18650 LiPo battery that is part of an off the shelf portable battery pack that charges and boosts the battery to 5Volts and can supply about 2 Amps of power.
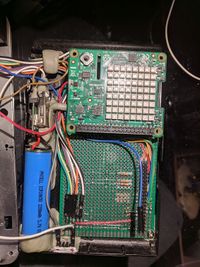
Internally the Picorder uses a perforated protoboard as a circuit backplane so all the components can lay flat within the enclosure. The backplane is affixed to the back panel of the Tricorder enclosure with Apoxie Sculpt mounds that have nuts embedded into them.
The screen enclosure had to be destructively dissasembled, and the standoffs that were broken were fully removed to provide maximum space within the case. The original button and LED pcb was removed and discarded, a new PCB replaced it that merely passed signals to and from the Pi. Everything is held in place with Apoxie Scuplt and so is very crude.
The current status of the Picorder is somewhat complete. Basic functionality has been achieved; the program logs values from the sense hat and displays them.
Errors
The screen selected for this project is 6 Volts, not 5. I had to use a boost module to provide the screen with a steady 6+ volts so it would work without flickering.
Wiring
Sources
This project was made possible by information and inspiration provided by these sources:
- https://hackaday.io/project/5437-star-trek-tos-picorder - https://github.com/tobykurien/rpi_lcars
Resources
Hardware
You can find all the necessary construction documents in the "construction" folder at the github link.
Adafruit parts Wishlist is here: http://www.adafruit.com/wishlists/435166
The base I used for the tricorder: https://www.amazon.ca/gp/product/B001820194/ref=ox_sc_sfl_title_6?ie=UTF8&psc=1&smid=A3DWYIK6Y9EEQB
Software
Originally the Picorder ran on standalone software, but now is supported by PicorderOS
Media
This is the reddit post I made in 2009 that first started me on the journey.
Youtube Video
I decided to make a youtube video under my Obso1337 channel to walk through how I designed and built this device.
Later I made a video detailing the tear down of the original build in preparation for a rebuild (still to come).
Media Coverage
The Picorder has been discussed in a couple places so far. I'm honoured to have a project of mine covered by these publications.
- A very nice piece written for Hackaday by Al Williams.
- A story for Neoteo. Written in Spanish by Lisandro Pardo
Similar and Clone Devices
- Somewhat rudimentary, but nevertheless effective clone of the TR-108. Uses a standard project box instead of the DS Tricorder Toy.
- A clone of the tr-108 with extended capabilities and features. Very nice build into a DS Tricorder toy but with improved accuracy to screen prop.
- Completely unique device. Not a clone of the tr-108 but an entirely new device built into a TNG Tricorder using the BM680 and AGM88 sensor packages.


