Difference between revisions of "Picorder"
Directive0 (Talk | contribs) (→Wiring) |
Directive0 (Talk | contribs) (→Wiring) |
||
| Line 30: | Line 30: | ||
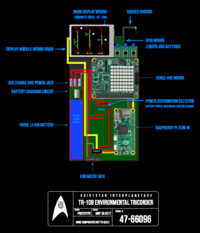
==Wiring== | ==Wiring== | ||
| − | [[File:Picorder_wiring.png|200px|thumb | + | [[File:Picorder_wiring.png|200px|thumb|Picorder Wiring Diagram]] |
The layout of the Picorder. | The layout of the Picorder. | ||
Revision as of 06:30, 14 March 2018
The TR-108 is a Raspberry Pi Zero based system that includes a sensor package, battery, display and supplemental components to provide a satisfying and accurate Tricorder experience. In the interest of inspiring others to build on what I have done I am providing all of the documentation I can.
Contents
Notes
Basic functionality is complete; the program logs values from the sense hat and displays them. Future releases will optimize this code, for now its a dogs breakfast. What do you expect, I'm a noob.
Requirement:
Picorder.py uses a number of modules to operate, specifically:
- Pygame
- Senshat
- RPi.GPIO
- sys
- time
- math
- os
- psutil (PC Demo only)
Be sure you have these modules installed before attempting to run this program.
Construction
You can find all the necessary construction documents in the "construction" folder.
Adafruit parts Wishlist is here: http://www.adafruit.com/wishlists/435166
The base I used for the tricorder: https://www.amazon.ca/gp/product/B001820194/ref=ox_sc_sfl_title_6?ie=UTF8&psc=1&smid=A3DWYIK6Y9EEQB
Wiring
The layout of the Picorder.
Sources
This project was made possible by information and inspiration provided by these sources: - https://hackaday.io/project/5437-star-trek-tos-picorder - https://github.com/tobykurien/rpi_lcars
Resources
Software
Youtube Video
I decided to make a youtube video under my Obso1337 channel to walk through how I designed and built this device.

